How to Migrate Website to New Host

Do you want to migrate a website to a new host without breaking anything, causing downtime, or other issues that could hurt your Google Rankings? Don’t sweat it when you are already on this blog post.
The transfer process is straightforward if you have a cPanel Hosting with your current and new hosting providers. First, you need to update your hosting provider to perform a migration using the cPanel transfer tool. After that, the cPanel transfer tool will manage everything for you.
But what if you are using any custom control panel? This guide focuses on a generic process of migrating a website to a new host. Even if you are using the custom control panel, the steps will work for you hassle-free. You can even follow the steps mentioned here if you have developed your website with a custom development platform, WordPress, Drupal, Joomla, or any other CMS or shopping cart.
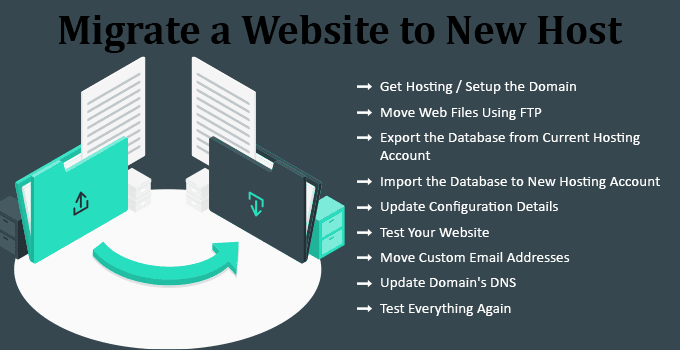
Migrate a Website to New Host

The migration process is straightforward and should not break anything. Again, though, we strongly recommend securing the full backup of your data before getting started. Having the latest working backup before making significant changes to your website is always good. Let’s proceed.
1) Get Hosting / Setup the Domain

Once determined to change the hosting provider, you must purchase the hosting account based on your requirement. If you are unsure which hosting account is the best option for you, contact our hosting experts now.
If you already have a hosting plan with your new provider and if it allows hosting multiple domains, you need to add your domain from the Addon Domain or similar option. When you add the domain, the system will automatically set up the website in the web server, add required host entries, create the DNS zone, and much more. You do not need to do anything manually.
2) Move Web Files Using FTP

Once your new hosting account/environment is ready, it is time to move the web files. First, you need to create a zip file of the web files from your current hosting account and download it. Once you have the zip file, upload it to the new hosting account and extract it.
Most of the time, all your required web files are stored in public_html (in cPanel), wwwroot (in windows hosting), or httpdocs (in plesk) directory. But, you must double-check the exact web file path with your developer/hosting provider.
You can use the File Manager option available in your control panel to move the web files. And if you do not find such an option, use the FTP client to transfer the files from the old hosting provider to the new one.
3) Export the Database from Current Hosting Account

You do not need to worry about the database if you have a simple static HTML site because HTML/static sites do not have a database.
If you are using PHP or any other frameworks or CMS like; WordPress, Joomla, Drupal, or any shopping cart, you must have a database associated with your website. The database is used to store important data and other site settings.
You will need to export the database and import it to your new hosting account. Most of the control panel gives the option of one-click database export to export the database. If this option is available in your control panel, use it to export the database.
If you do not see the database export option in your control panel, access your phpMyAdmin, click on the database in concern, and click on Export. Next, select “Quick” in Export Method and “SQL” in Format and give it a go. The system will generate and download the database dump file to your local system.
4) Import the Database to New Hosting Account

Once you have a database dump file ready, you will need to import the database into your new hosting account.
Most of the control panel comes with an option to import the database. If the Import Database option is available in your control panel, click on it. Then browse the database dump file and import it.
If you do not have this option, create the database from your control panel with the same name as your old database, and navigate to the phpMyAdmin option from your control panel. Once you have access to phpMyAdmin, click on the database we have created. You will now have an option to import the database. Next, select the dump file from the browse option. Keep all rest of the options as they are and give it a go. Based on the database size, you will see the success message within a few seconds or minutes.
Important: Once you have imported the database into the new hosting, you must create the database user. For better control and fewer code changes, keep the database username and password the same as your old hosting account. Otherwise, you will need to change your entire code where applicable.
5) Update Configuration Details

Frankly, this step is unpredictable. Based on your website settings, you might or might not need to follow this step.
For example;
- If you have any custom path in your code, you must update it in code with the new hosting account.
- If you have set up a different database name, username, or password with a new account, you need to update them in your code.
- If you have special permission for any folder, you must apply for them with a new hosting account.
- In short, any custom changes that do not come with a default hosting account must be taken care of before making your site live with a new hosting account.
6) Test Your Website

It is time to test your website’s functionality in a new hosting account. But, you can not do it by browsing the domain as the DNS is still pointing to the old hosting account.
Option 1 – Use the Temporary URL from New Hosting Account:
Most hosting providers give an option of a temporary URL. You will find it in your welcome email, OR if you do not see it, you can ask your hosting provider. Once you have access to the temporary URL, test the website thoroughly.
Option 2 – Use Host Entry in your Local System:
You must point your domain to a new hosting account within your local system. You can use the hosts file to do this.
Windows System – hosts file path: C:\Windows\System32\drivers\etc\hosts
Linux System – hosts file path: /etc/hosts
Get the IP address of your site from your control panel (New Hosting Account’s IP Address) and make the host entry in your local system. It should look like this:
111.111.111.111 yourdomain.com
Once you have entered it, you can access your domain in the browser. You will see the site is loading from the new hosting account. You can test the functionality of your site.
7) Move Custom Email Addresses

Suppose you are using third-party email services like; Google, Outlook, etc. You can skip this step.
If you are using an email service from your old hosting provider, you must create all those email accounts in your new hosting account/control panel. Once you have created the email accounts, find an option to import emails from another server. You can import all old email communications from the old server to the new server. You need to enter your old email server’s SMTP address, email account (username), and password. The system will import all your emails to the new account. You must do this for all email accounts you have created.
8) Update Domain’s DNS

Now, as you have tested your site in a new home, it is time to make it live from the new server.
If you are on a shared hosting account, you must have received the nameservers information from your new host. Then, you must update the nameservers for your domain. You can do it from your domain control panel (From where you registered the domain).
The nameservers look like this:
ns1.yourhost.com
ns2.yourhost.com
If you have any custom DNS record, you will need to update it from your DNS zone. You will find it in your control panel. At any step, if you find difficulties, you can always contact the hosting provider’s support staff for assistance.
Once you have made the changes in DNS, your site is live from the new server.
9) Test Everything Again

Once the DNS records are propagated and your site is loading from the new server, it is time to test the site again.
You must test the website thoroughly. Check the design/layouts, buttons, forms, login, registration, order flow, and everything. Also, check the email service by sending and receiving test emails at newly created email accounts.
Once everything is working, bingo!! You have completed the migration process.
As the last step, you should ensure that you have the last working backup from the old hosting account, and then you can cancel that hosting plan to avoid double billing charges.
Migrate Website to New Host – The Conclusion
You may find the topic – Migrate a Website to New Host – challenging at first. But, Migrating a website to a new host is not difficult. We have simplified all the steps in this guide. If you still face any issues, you can always contact us. We do offer free migration with any plan you may purchase.


